服务器配置
导航
[TOC]
准备环境
- Nginx
- Mysql8.0
- Redis
- Supervisor
- .Net6
参考文章
- Mysql8.0
- Redis
- .Net6
- Nginx
- Supervisor
前置条件
系统环境为Ubuntu20.04
更换源
备份
sudo cp /etc/apt/sources.list /etc/apt/sources.list.bak
修改
sudo vim /etc/apt/sources.list
将source.list文件内容替换成下面的
deb http://mirrors.aliyun.com/ubuntu/ trusty main restricted universe multiverse
deb http://mirrors.aliyun.com/ubuntu/ trusty-security main restricted universe multiverse
deb http://mirrors.aliyun.com/ubuntu/ trusty-updates main restricted universe multiverse
deb http://mirrors.aliyun.com/ubuntu/ trusty-proposed main restricted universe multiverse
deb http://mirrors.aliyun.com/ubuntu/ trusty-backports main restricted universe multiverse
deb-src http://mirrors.aliyun.com/ubuntu/ trusty main restricted universe multiverse
deb-src http://mirrors.aliyun.com/ubuntu/ trusty-security main restricted universe multiverse
deb-src http://mirrors.aliyun.com/ubuntu/ trusty-updates main restricted universe multiverse
deb-src http://mirrors.aliyun.com/ubuntu/ trusty-proposed main restricted universe multiverse
deb-src http://mirrors.aliyun.com/ubuntu/ trusty-backports main restricted universe multiverse
更新并处理文件目录
sudo apt-get update -y
sudo mkdir -p /var/www/apps/smartLift
sudo mkdir -p /var/www/apps/wuye
sudo mkdir -p /var/www/apps/weibao
sudo mkdir -p /var/www/apps/yunwei
sudo mkdir -p /var/www/upload
sudo mkdir -p /var/www/upload/resources
sudo mkdir -p /www/wwwlogs
一、安装Nginx配置
打开命令行窗口输入安装命令
sudo apt install nginx -y
访问localhost测试是否正常工作
如何看到图片中的内容则nginx安装成功

Nginx配置
配置文件 /etc/nginx/vhosts
cat /etc/nginx/nginx.conf
user www-data;
worker_processes auto;
pid /run/nginx.pid;
include /etc/nginx/modules-enabled/*.conf;
events {
        worker_connections 768;
        # multi_accept on;
}

http {

        ##
        # Basic Settings
        ##

        sendfile on;
        tcp_nopush on;
        tcp_nodelay on;
        keepalive_timeout 65;
        types_hash_max_size 2048;
        # server_tokens off;

        # server_names_hash_bucket_size 64;
        # server_name_in_redirect off;

        include /etc/nginx/mime.types;
        default_type application/octet-stream;

        ##
        # SSL Settings
        ##

        ssl_protocols TLSv1 TLSv1.1 TLSv1.2 TLSv1.3; # Dropping SSLv3, ref: POODLE
        ssl_prefer_server_ciphers on;

        ##
        # Logging Settings
        ##

        access_log /var/log/nginx/access.log;
        error_log /var/log/nginx/error.log;

        ##
        # Gzip Settings
        ##

        gzip on;

        # gzip_vary on;
        # gzip_proxied any;
        # gzip_comp_level 6;
        # gzip_buffers 16 8k;
        # gzip_http_version 1.1;
        # gzip_types text/plain text/css application/json application/javascript text/xml application/xml application/xml+rss text/javascript;

        ##
        # Virtual Host Configs
        ##

        include /etc/nginx/conf.d/*.conf;
        include /etc/nginx/sites-enabled/*;
        include /etc/nginx/vhosts/*.conf;
}


#mail {
#       # See sample authentication script at:
#       # http://wiki.nginx.org/ImapAuthenticateWithApachePhpScript
#
#       # auth_http localhost/auth.php;
#       # pop3_capabilities "TOP" "USER";
#       # imap_capabilities "IMAP4rev1" "UIDPLUS";
#
#       server {
#               listen     localhost:110;
#               protocol   pop3;
#               proxy      on;
#       }
#
#       server {
#               listen     localhost:143;
#               protocol   imap;
#               proxy      on;
#       }
#}
API站点配置
域名:api.glfiot.com.conf
cat api.glfiot.com.conf
server
{
    listen 80;
    server_name api.glfiot.com;
    index index.html index.htm default.htm default.html;
    root /var/www/apps/smartLift;
location ~* \.(gif|png|jpg|css|js|woff|woff2)$
{
        proxy_pass http://127.0.0.1:8081;
    proxy_set_header Host $host;
    proxy_set_header X-Real-IP $remote_addr;
    proxy_set_header X-Forwarded-For $proxy_add_x_forwarded_for;
    proxy_set_header REMOTE-HOST $remote_addr;
    expires 12h;
}

    location /
{
    proxy_pass http://127.0.0.1:8081;
    proxy_set_header Host $host;
    proxy_set_header X-Real-IP $remote_addr;
    proxy_set_header X-Forwarded-For $proxy_add_x_forwarded_for;
    proxy_set_header REMOTE-HOST $remote_addr;

    add_header X-Cache $upstream_cache_status;

    #Set Nginx Cache

        add_header Cache-Control no-cache;
}
    #禁止访问的文件或目录
    location ~ ^/(\.user.ini|\.htaccess|\.git|\.svn|\.project|LICENSE|README.md)
    {
        return 404;
    }

    access_log  /www/wwwlogs/api.glfiot.com.log;
    error_log  /www/wwwlogs/api.glfiot.com.error.log;
}
维保站点
域名: wb.glfiot.com.conf
root@iot-web-4001:/etc/nginx/vhosts# cat wb.glfiot.com.conf
server
{
    listen 80;
    server_name wb.glfiot.com;
    index index.html index.htm default.htm default.html;
    root /var/www/apps/weibao;
    add_header Strict-Transport-Security "max-age=31536000";
    location / {
      try_files $uri $uri/ /index.html;
    }


    #SSL-END


    #禁止访问的文件或目录
    location ~ ^/(\.user.ini|\.htaccess|\.git|\.svn|\.project|LICENSE|README.md)
    {
        return 404;
    }

    access_log  /www/wwwlogs/wb.glfiot.com.log;
    error_log  /www/wwwlogs/wb.glfiot.com.error.log;
}
物业站点
域名: wy.glfiot.com.conf
cat wy.glfiot.com.conf
server
{
    listen 80;
    server_name wy.glfiot.com;
    index index.html index.htm default.htm default.html;
    root /var/www/apps/wuye;
    add_header Strict-Transport-Security "max-age=31536000";
    location / {
      try_files $uri $uri/ /index.html;
    }


    #SSL-END


    #禁止访问的文件或目录
    location ~ ^/(\.user.ini|\.htaccess|\.git|\.svn|\.project|LICENSE|README.md)
    {
        return 404;
    }

    access_log  /www/wwwlogs/wy.glfiot.com.log;
    error_log  /www/wwwlogs/wy.glfiot.com.error.log;
}
运维站点
域名: yw.glfiot.com.conf
cat yw.glfiot.com.conf
server
{
    listen 80;
    server_name yw.glfiot.com;
    index index.html index.htm default.htm default.html;
    root /var/www/apps/yunwei;
    add_header Strict-Transport-Security "max-age=31536000";
    location / {
      try_files $uri $uri/ /index.html;
    }


    #SSL-END


    #禁止访问的文件或目录
    location ~ ^/(\.user.ini|\.htaccess|\.git|\.svn|\.project|LICENSE|README.md)
    {
        return 404;
    }

    access_log  /www/wwwlogs/yw.glfiot.com.log;
    error_log  /www/wwwlogs/yw.glfiot.com.error.log;
}
二、安装Redis
打开命令行窗口输入命令
sudo apt install redis-server -y
vim /etc/redis/redis.conf
设置Redis密码
bind * -::*
requirepass j2GfJuLFR8
三、安装 asp.net 运行环境(.net 6)
打开命令行窗口输入命令
wget https://packages.microsoft.com/config/ubuntu/20.04/packages-microsoft-prod.deb -O packages-microsoft-prod.deb
sudo dpkg -i packages-microsoft-prod.deb
rm packages-microsoft-prod.deb
sudo apt-get update; \
  sudo apt-get install -y apt-transport-https && \
  sudo apt-get update && \
  sudo apt-get install -y dotnet-sdk-6.0
四、 安装数据库(Mysql8.0)
打开命令行窗口输入命令
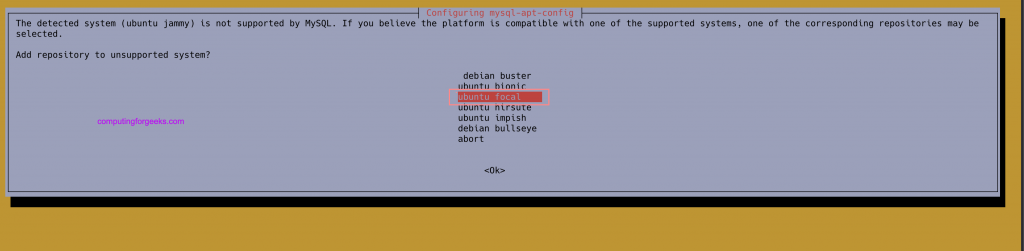
wget https://dev.mysql.com/get/mysql-apt-config_0.8.22-1_all.deb
sudo dpkg -i mysql-apt-config_0.8.22-1_all.deb
选择客户端版本


sudo apt update
$ sudo apt-cache policy mysql-server
mysql-server:
  Installed: (none)
  Candidate: 8.0.29-1ubuntu20.04
  Version table:
     8.0.29-1ubuntu20.04
        500 http://repo.mysql.com/apt/ubuntu focal/mysql-8.0 amd64 Packages
sudo apt install mysql-client mysql-server
sudo apt install mysql-client mysql-community-server mysql-server
Need to get 35.3 MB of archives.
After this operation, 311 MB of additional disk space will be used.
Do you want to continue? [Y/n] y
设置密码

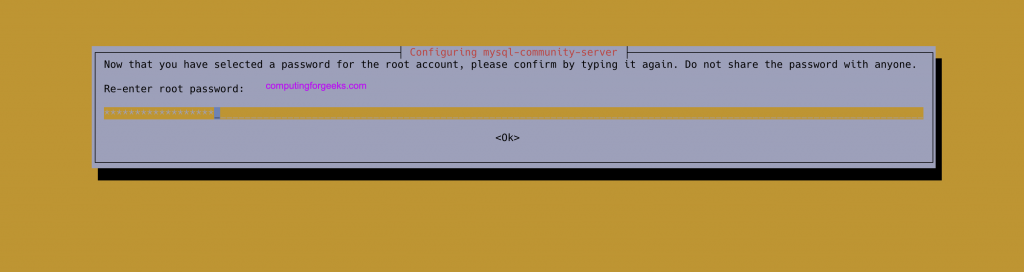
初始化MySQL配置
sudo mysql_secure_installation
Enter current password for root (enter for none): <Enter password>
VALIDATE PASSWORD PLUGIN can be used to test passwords
and improve security. It checks the strength of password
and allows the users to set only those passwords which are
secure enough. Would you like to setup VALIDATE PASSWORD plugin?

Press y|Y for Yes, any other key for No: Y

There are three levels of password validation policy:

LOW    Length >= 8
MEDIUM Length >= 8, numeric, mixed case, and special characters
STRONG Length >= 8, numeric, mixed case, special characters and dictionary                  file

Please enter 0 = LOW, 1 = MEDIUM and 2 = STRONG: 1
Using existing password for root.

Estimated strength of the password: 25
Change the password for root ? ((Press y|Y for Yes, any other key for No) : n


Remove anonymous users? [Y/n] Y
Disallow root login remotely? [Y/n] n
Remove test database and access to it? [Y/n] Y
Reload privilege tables now? [Y/n] Y
Thanks for using MariaDB!
启用Mysql远程访问
sudo vim /etc/mysql/mysql.conf.d/mysqld.cnf
# By default we only accept connections from localhost
#bind-address   = 127.0.0.1
bind-address   = 0.0.0.0

# cmd
sudo systemctl restart mysql
更新密码
必须项
mysql -uroot -p;
use mysql;
ALTER USER 'root'@'%' IDENTIFIED WITH mysql_native_password BY 'youpassword';
ALTER USER 'root'@'localhost' IDENTIFIED WITH mysql_native_password BY 'youpassword';
五、 安装Supervisor
打开命令行窗口输入命令
apt-get update -y
apt-get install supervisor -y
查看Supervisor 版本
supervisord -v
显示如下
4.1.0
Supervisor 配置
基本设置
/etc/supervisor
cat supervisord.conf
; supervisor config file

[unix_http_server]
file=/var/run/supervisor.sock   ; (the path to the socket file)
chmod=0700                       ; sockef file mode (default 0700)

[supervisord]
logfile=/var/log/supervisor/supervisord.log ; (main log file;default $CWD/supervisord.log)
pidfile=/var/run/supervisord.pid ; (supervisord pidfile;default supervisord.pid)
childlogdir=/var/log/supervisor            ; ('AUTO' child log dir, default $TEMP)

; the below section must remain in the config file for RPC
; (supervisorctl/web interface) to work, additional interfaces may be
; added by defining them in separate rpcinterface: sections
[rpcinterface:supervisor]
supervisor.rpcinterface_factory = supervisor.rpcinterface:make_main_rpcinterface

[supervisorctl]
serverurl=unix:///var/run/supervisor.sock ; use a unix:// URL  for a unix socket

; The [include] section can just contain the "files" setting.  This
; setting can list multiple files (separated by whitespace or
; newlines).  It can also contain wildcards.  The filenames are
; interpreted as relative to this file.  Included files *cannot*
; include files themselves.

[include]
files = /etc/supervisor/conf.d/*.conf
配置站点守护 smartLift.conf
cat smartLift.conf
[program:smartLift]
directory=/var/www/apps/smartLift
command=/usr/share/dotnet/dotnet /var/www/apps/smartLift/SmartLift.WebApp.dll --urls http://*:8801
autostart=true
autorestart=true
startsecs=5
priority=1
stopasgroup=true
killasgroup=true
environment=ASPNETCORE_ENVIRONMENT=Production
user=root
stderr_logfile=/var/log/smartLift.err.log
stdout_logfile=/var/log/smartLift.out.log
查询Supervisor启动状态
systemctl status supervisor
展示如下
Loaded: loaded (/lib/systemd/system/supervisor.service; enabled; vendor preset: enabled)
Active: active (running) since Thu 2020-10-01 13:31:42 UTC; 9s ago
Docs: http://supervisord.org
Main PID: 14419 (supervisord)
Tasks: 1 (limit: 2353)
Memory: 14.2M
CGroup: /system.slice/supervisor.service
└─14419 /usr/bin/python3 /usr/bin/supervisord -n -c /etc/supervisor/supervisord.conf